
Overview
This guide supports both managers and employees with all aspects of leave management in Roubler. It covers everything from configuring leave settings and managing entitlements, to applying for leave, reviewing requests, and troubleshooting issues such as balance discrepancies or approval workflow errors.
How Leave Accrues in Australia
Roubler supports Australian leave accrual in line with Fair Work standards, using hours as the primary unit. This ensures precise tracking of entitlements and consistent payroll outcomes across full-time, part-time, and casual staff.
Additional Notes:
- Leave typically accrues at 7.6 hours per 38-hour week, for a total of 152 hours annually (equivalent to 4 weeks).
- Public holidays do not reduce leave balances unless they fall during approved leave.
- Leave loading (e.g. 17.5%) may apply depending on the award or enterprise agreement.
- Leave accrual is updated each pay run, ensuring real-time accuracy.
Leave accrual varies depending on the region. Please see the articles below for more information on how leave accrues in regions outside of Australia:
How leave accrues in UK - 2025 Roubler Leave Troubleshooting Guide UK WORK IN PROGRESS
How leave accrues in NZ - 2025 Roubler Leave Troubleshooting Guide NZ WORK IN PROGRESS
Understanding Leave Balances
Roubler displays leave balances based on how they are configured in the integrated payroll system. While the units (e.g. hours or days) can be displayed differently in Roubler, the system will automatically convert them to match the payroll setup.
If you need Roubler to fully align with the pay engine, you can either leave the unit field blank or select the appropriate unit manually.
Leave accruals can be set up in several ways:
- Per hour worked – for part-time or casual employees who earn leave based on hours worked
- Per pay run – for salaried employees who accrue a set amount each pay period
- Annually – leave is granted in full at the beginning of the leave year
- In advance – the full entitlement is granted at the start of employment
Once leave is accrued, it appears in the employee’s Leave & Availability section and updates automatically with each payroll.
Managers can choose whether to show or hide leave balances from employees. This setting can be found via:
Dashboard > Management > Settings > Leave Types
From here, select the relevant leave type and adjust the visibility setting as needed.
Important: Make sure a Service Type is selected for each leave type. This ensures correct mapping between the payroll system and Roubler so balances sync accurately.
Set a Minimum Leave Balance Threshold
- Go to Management > Settings > Leave Types
- Add or edit a leave type
- In the popup, set the Minimum Leave Balance
- Click Save
Employees will see an error if they try to request leave that drops their balance below this threshold.
🔒 Managers and Admins can override this restriction.
The leave types available to employees depend on the Leave Allowance Template and Leave Entitlement assigned in their Finance and Payroll settings:
- If no template or entitlement is assigned: Employees can apply for any leave type that is visible (i.e. not hidden).
- If a template or entitlement is assigned: Employees can only apply for leave types included in that specific template.
❗Note for employees: If you need to apply for a leave type that isn’t available to you, please contact your direct manager for assistance.
View Leave Balances of Employees as a Manager
Managers can view an employee's leave balances by navigating to their Leave and Availability page and scrolling to the bottom right section. This page also displays all past and current leave requests, regardless of status, in one place.
❗Please note that employees do not have access to a date picker like managers do. They can only view their leave balances as at the current date, and there are no settings available to enable or disable this per company.
Just to clarify—the "As at" balance reflects the actual current balance recorded for the employee in the pay engine. Any other figures are simply projections based on future-dated leave or work schedules.
Applying for Leave on the Web
Whether you're an employee or a manager, the process for applying for leave is the same. Simply navigate to your portal and select the Leave and Availability tile.
You will be directed to this page below where you select the + icon to create your leave request.
From this screen, you'll need to complete the following fields:
- Leave Type – Select the appropriate type of leave (e.g. Annual, Personal, etc.)
- Duration – Choose whether the leave is for a full day, half day, or custom hours
- Start Date and End Date – Enter the dates the leave will begin and end
- Start and Finish Times – Specify times if you're using custom hours
- Notes – Provide a brief reason for the leave (this field is mandatory)
- Supporting Documents – Upload any relevant documentation, if required
Once all fields are complete, click Save to submit your request.
At the bottom of the page, you'll see your leave balances:
- Forecasted shows the leave you're expected to accrue in the future.
- Approved refers to leave that has been approved but not yet processed in a pay run.
-
Available is the balance you're currently entitled to take.
Applying for Leave via the App
Both employees and managers can efficiently handle leave requests through the Roubler mobile app.
For Employees:
- To submit, edit, or cancel a leave request:
- Select the "Leave & Availability" tile from your portal
- Click on the relevant date(s)
- Complete all required fields – including notes (mandatory)
- Save your changes to submit or update the request
- You will then see a request overview where you can go back and edit or submit.
- Confirmation will be given once submitted
- Employees also have the option to view Upcoming, Historical or all Leave Balances.
Employees can track their leave history at every stage — submitted, pending, approved, or declined.
The leave types available to employees depend on the Leave Allowance Template assigned in their Finance and Payroll settings:
- If no template is assigned: Employees can apply for any visible leave type (i.e., not hidden).
- If a template is assigned: Employees can only apply for leave types that are included in that template.
❗As an employee, if you need to apply for a leave type that is not available, please reach out to your direct manager.
Managers: How to Approve Leave in the App
- The manager will receive a notification when an employee they manage submits a leave request. The notification will look something like this:
- The manager can then visit their "Manage Leave & Availability" tile within the app to action the request.
- The manager, depending on the access level will have the following options.
- Edit leave request
- View leave request
- Approve leave request
- Decline leave request
To check the leave types available within the business Leave Allowance Templates, navigate to:
Management > Settings > Leave Entitlements
- Click the magnifying glass next to the entitlement you need to review.
- Click the magnifying glass again to open the list of attached leave types.
- Here, you will see all leave types employees can apply for.
If you need to edit, add, or remove leave types, you can do so directly from this page.
Managing Leave on the desktop
Bulk Approval and Decline Options
Managers can now approve or decline multiple leave requests at once:
You’ll see a panel displaying the leave details, including any other team members who are also on leave during the same period. From there, you can choose to approve none, some, or all of the leave requests.
-
Automatic Approval: Leave requests without any issues are approved automatically, streamlining the process for both employees and managers.
Exceptions Flagged: If a request has an issue (e.g., insufficient leave balance), it will be flagged. Managers can then review the request, address the issue, or bypass the warning with a single click.
Handling Exceptions
The system highlights alerts for flagged leave requests, such as insufficient leave balance or unauthorized. For flagged requests:
- Managers can see affected dates and details, such as how many other employees are already on leave.
- Alerts ensure transparency, helping managers make informed decisions.
Approving Partial Leave Requests
If an employee requests more leave than they have available:
- When a leave request is submitted and the employee does not have enough balance to cover the entire requested period, Roubler will decline the entire leave request.
Examples:
- Example 1: An employee requests 8 hours of leave but only has 2 hours available — the request will be declined.
- Example 2: An employee submits a single leave request for a 7-day period but only has 5 days available — the full request will be declined.
- Example 3: An employee submits 3 separate 1-day leave requests and has 2 days of leave available — 2 requests will be approved, and the 3rd will be declined.
Simplified Email Notifications
To reduce unnecessary notifications:
- Employees receive one email summarising all approved leave.
- A separate one email summarises all declined leave.
Adjust Leave
There may be times when leave needs to be adjusted. Common examples include:
- Example 1: Annual Leave was paid, but it should have been Sick Leave.
- Example 2: An employee was incorrectly credited with 8 hours of Annual Leave instead of Sick Leave.
- Example 3: An employee returned to work earlier than expected, but the full leave period was already included in the pay run.
Example 1: Annual Leave was paid instead of Sick Leave
To correct this:
- Create a new pay run, or make the adjustment in your next scheduled pay run.
- Open the pay run and click on the employee’s name.
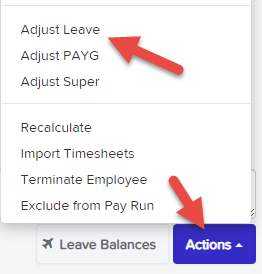
- At the bottom right of the screen, click the "Actions" button.
- Select "Adjust Leave".
- Make the necessary changes by:
- Reversing the incorrectly paid Annual Leave
- Applying the correct Sick Leave in its place
Make sure to double-check that the leave balances are updated correctly once the adjustment is complete.
Once you've selected Adjust Leave, update the balances as needed.
🔁 Important: This is a leave adjustment, so the direction of the adjustment matters:
- A negative adjustment will deduct leave (e.g. if the employee has taken leave).
- A positive adjustment will return leave to the balance (e.g. if correcting or replacing previously taken leave).

- If "Apply Earnings Rules" is ticked, the system will add an earnings line showing the adjustment.
- If 17.5% leave loading is enabled and:
- Leave is taken (negative adjustment), loading will be added.
- Leave is replaced (positive adjustment), loading will be reversed/deducted.
💬 You can leave an explanation in the "Notes for This Pay Run" section if needed.
Once done, the pay run can be finalised.
Example 2:
An employee was incorrectly credited with 8 hours of Annual Leave, but it should have been Sick Leave.
To correct this:
- Go to the Leave Adjustments section in the pay run.
- Enter:
- +8 hours to Annual Leave (to return the incorrect leave)
- –8 hours to Sick Leave (to apply the correct leave)
How it appears in the pay run:
- If the Apply Earnings Rules and Apply Leave Loading boxes are ticked (and depending on your leave category setup):
- An earnings line will be created to reverse the 8 hours of Annual Leave pay.
- If leave loading applies, it will also be reversed.
- The –8 hours adjustment to Sick Leave will only affect the leave balance and will not appear in the earnings section, since no payment is being made for that adjustment.
Example 3:
An employee returns to work earlier than expected, but their full leave request has already been included in the pay run.
To correct this:
- Follow the same steps as outlined in the previous examples.
- In the Leave Adjustments section, add a positive adjustment to the relevant leave category (e.g. Annual Leave or Sick Leave).
- This will return the unused leave to the employee’s balance.
- In the Notes for This Pay Run section, include a short explanation (e.g. "Employee returned to work earlier than planned; leave adjusted accordingly").
⚠️ Important:
Only tick the Apply Earnings Rules or Leave Loading boxes if:
- The employee would not normally have been paid during that time, or
- Leave loading was originally paid and now needs to be reversed.
Pay Run Warnings
(Leave-Related)
During a pay run, the system may display certain warnings related to leave. These help you identify issues that may impact payroll accuracy. Warnings can appear as soon as the pay run is created or as changes are made within it.
⚙️ Note: You can customise which pay run warnings appear by going to your Pay Schedule Settings.
Pay Run Warnings: How to View and Understand Them
-
Employee taking more leave than accrued
This warning appears when an employee is scheduled to take more leave than their current balance allows. -
Employee has reached their leave cap
Displays when an employee’s leave entitlement has reached the maximum allowed accrual (e.g. capped at 10 hours per year). -
Pending leave requests
Indicates that an employee has submitted a leave request during the pay run period that hasn't yet been approved.
⚠️ Pending leave is not processed unless approved. This applies to both manual and automated pay runs. -
Leave request extends past pay run dates
The leave request spans multiple pay periods. Only the portion falling within the current pay run will be processed. -
Leave request ends before pay run dates
The request falls completely before the pay run period. It won’t be automatically included and should be manually reviewed if necessary.
How does the System Behave when Taking Leave
Taking leave is one of the core features of any payroll system. With the exception of unpaid leave, the standard expectation is that when an employee applies for 'leave taken', they are automatically paid for that leave in the pay run. Roubler follows this principle, though there are a few scenarios to consider when understanding how 'leave taken' is applied.
A key factor is how the employee is paid — either through a default/fixed pattern of hours or via timesheets — as this impacts how leave is processed in the pay run.


When employees on a fixed pattern of hours take leave, they’re already being paid their standard hours in the pay run. In this case, the payroll system simply needs to reduce the employee’s leave balance by the amount of leave taken — this process happens automatically.
In the latest versions of the system (now the default), leave earnings are separated from ordinary earnings in the pay run. This is achieved by adding two earnings lines when leave is taken:
- One line removes the leave hours from the ordinary pay category.
- The second line applies those hours to the appropriate leave pay category.
The net effect of these two lines is $0, meaning the employee’s total pay remains unchanged — they’re just being paid from a different earnings category.
Important: Make sure to include any leave hours alongside other hours worked in the same pay period.
Example
An employee is set to be paid 38 hours per week by default.
- If the employee takes 38 hours of Annual Leave, the system will automatically deduct 38 hours from the ordinary hours and reallocate them as Annual Leave.
- This ensures they are not paid twice — once for ordinary time and once for leave — and their total paid hours remain at 38.
- If they take 10 hours of leave, only those 10 hours are deducted from ordinary hours, with the remainder paid as usual.

If there are no other hours worked in the pay period, you’ll need to manually add the leave hours to ensure the employee is paid correctly.
To do this:
- Go to the pay run.
- Open the relevant employee's record.
- Click the Actions button and select Add Earnings.
- Manually add an earnings line for the leave pay category and enter the number of leave hours being taken.
Employees Paid via Timesheets
For employees who are paid based on submitted timesheets, their Pay Run Defaults should be set to:
“Use timesheets to submit all time worked.”
In this case, leave taken must be submitted via a timesheet (either by the employee or manager). These leave entries will then flow through to the pay run and be paid accordingly.

When timesheet-based employees take leave, the system will automatically generate an earnings line in the pay run to pay for the leave taken.
Unlike fixed-hours employees, no deduction line is created, as it's assumed the employee won’t be submitting a timesheet for hours not worked due to being on leave.
Example
In the example below, the employee has:
- Submitted a timesheet for 8 hours worked
- Taken 30 hours of leave
As a result, the pay run reflects 38 total hours paid — combining both worked and leave hours.

Leave Without Pay (LWOP)
The main exception to standard leave processing is Leave Without Pay.
In this case, a leave transfer rule is used to deduct the leave hours from the employee’s primary pay category, effectively reducing the total paid hours for that period.
Note: No earnings line is added for LWOP, as the employee is not being paid for those hours.
Custom Setup – Leave Transfer Rules
Apart from LWOP, leave transfer rules are also useful when you want to allocate payments for specific leave types to a separate account in your ledger (e.g., for reporting or accounting purposes).
Example: Allocating Annual Leave to a Custom Pay Category
- Create a new pay category (e.g., "Annual Leave 2").
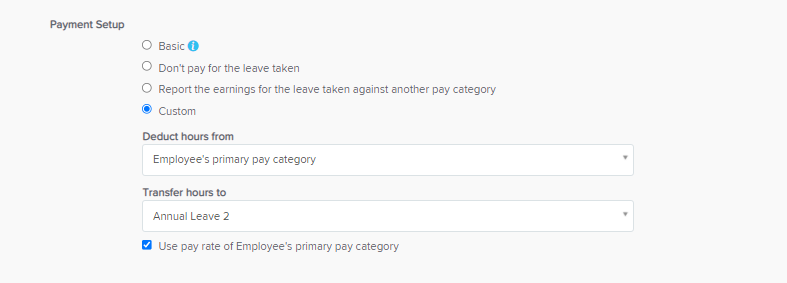
- In the Leave Categories settings, configure the relevant leave as a Custom payment setup.
- Set the following:
- Deduct hours from: Employee’s primary pay category
- Transfer hours to: Annual Leave 2 pay category
This setup ensures the cost of leave taken is correctly mapped to the appropriate ledger account, without affecting the overall pay calculation.
Important Note on Leave Transfer Rules
When leave transfer rules are configured, it's essential to ensure that the employee’s pay rate is correctly maintained on the relevant pay category.
If the employee is to be paid their base rate for leave taken, you can simply enable the option:
“Use pay rate of Employee’s primary pay category for transferred earnings line.”
This ensures that the system automatically applies the employee’s primary rate to the transferred earnings line during the pay run.
Leave Balances – Context Panel
Leave balances are automatically updated based on leave taken or accrued in the pay run.
To view an employee’s current balances, simply navigate to their profile and select Leave Balances.
This panel provides a real-time view of all leave categories, making it easy to track and verify entitlements.

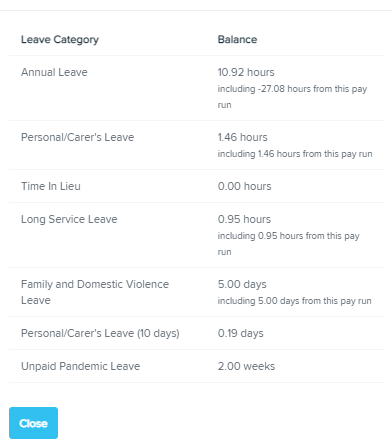
The Leave Balances context panel displays the total updated balance as of the current pay run, including any leave taken or accrued during the period.
For example, the employee below had 38 hours of Annual Leave available when the pay run was created. During the pay run:
- 30 hours were paid as Annual Leave
- 8 hours remained on the balance
- The employee also accrued 2.92296 hours, bringing the updated balance to 10.92296 hours

As such, the employee’s total current balance is 10.92 hours (8 remaining + 2.92296 accrued = 10.92296, rounded to 10.92).
The -27.08 value reflects the net impact on the leave balance during the pay run. It’s calculated by combining the leave taken (-30 hours) with the leave accrued (+2.92296 hours), resulting in -27.08.
Note: The full 30 hours of leave taken will still appear in the pay run, on the employee’s payslip, and in leave reports, regardless of the accrual offset.
How does approved leave look on the roster?
As long as Leave is selected in the roster filter, any approved leave will automatically appear on the roster as shown below.
Cashing Out Annual Leave
Under certain circumstances, employees may request to “cash out” their annual leave. Legally, employees must be paid the full amount they would have received had they taken the leave normally, including superannuation contributions.
This guide outlines the correct process for cashing out annual leave to ensure compliance with payroll requirements.
Key Considerations
✔️ Employees must receive full payment for cashed-out leave.
✔️ Superannuation must still be paid on cashed-out leave.
✔️ Leave does not continue to accrue on cashed-out leave.
✔️ If leave loading applies, it must be manually processed using a separate pay category.
Steps to Cash Out Annual Leave
Step 1: Create a Pay Category for Cashed-Out Leave
- Navigate to Management > Payroll > Payroll Settings > Pay Categories.
- Click Add New Pay Category.
- Name the pay category "Cashed Out Leave".
- Set the Units field to Fixed to ensure:
- It does not reduce ordinary worked hours.
- It does not accrue additional leave.
- If leave loading applies, create a second pay category:
- "Cashed Out Leave – Leave Loading"
- Configure it the same way.
📌 Example Setup:
Step 2: Adjust the Employee’s Leave Balance
- Open the pay run and locate the employee cashing out their leave.
- Click on their name to expand their pay run details.
- Click Actions > Adjust Leave.
(See Image Below: Adjust Leave Option)
- In the Leave Adjustment pop-up:
- Select Annual Leave as the leave category.
- Enter a negative value in the "Hours" field to match the number of hours being cashed out (e.g., -20 hours).
- Untick the Apply Earnings Rules box.
- Click Save.
📌 Example Setup:
Step 3: Add a Lump Sum Payment
- Click Actions > Add Lump Sum.
(See Image Below: Add Lump Sum Option)
- In the Earnings Line, fill out the following:
- Select Cashed Out Leave as the pay category.
- Choose Method A for tax calculation.
- Enter the number of pay periods the tax should be spread over (typically, the number of pay periods in a year).
- Enter the same number of hours as the negative adjustment in Step 2.
- Use the employee’s normal hourly rate.
- Click Save.
📌 Example Setup:
Step 4: Process Leave Loading (If Applicable)
- Repeat Step 3.
- Instead of selecting "Cashed Out Leave," select "Cashed Out Leave – Leave Loading".
- Enter the employee’s leave loading rate (17.5% of their normal hourly rate).
- Click Save.
📌 Example Setup:
(See Image Below: Leave Loading Entry)
Step 5: Review the Final Pay Run Record
Once completed, the pay run should reflect:
- Leave reduction in the balance.
- Earnings for the cashed-out leave.
- Super contributions included.
- Correct tax calculation applied.
📌 Example Final Pay Run Summary:
Process Lump Sum Payments, Bonuses or Leave in Advance
Processing Lump Sum Payments in the Pay Run
You can process Lump Sum payments directly within the Pay Run using the “Actions” button in the employee’s pay run details.
Note: Lump Sum payments are calculated using the ATO’s Method A, as outlined in this ATO article.
- For paying Leave in Advance, scroll down to the relevant section below.
- For Bonus Payments that don’t require tax aggregation, refer to the 'Processing a Bonus' section further down.
Steps to Process a Lump Sum Payment (e.g., Commission, Back Pay):
- Create a new pay run and open the employee’s earnings details.
- Click the “Actions” button in the bottom right corner.
- Select “Add Lump Sum Payments” from the pop-up menu.
- A new Other Earnings line will be added to the earnings section.
- Choose the relevant pay category for the lump sum (e.g., Back Pay, Commission, etc.).
- Hover over the blue “Lump Sum Payment” indicator for guidance on how to treat the payment according to ATO guidelines.
- Enter:
- The number of pay periods (weeks) the PAYG should be spread across.
- The total number of hours or amount being paid as a lump sum.
- The system will use the default rate of the selected pay category, but you can override the rate if needed.
- Click Save to apply the lump sum payment.
The lump sum will now be included in the employee’s pay with the correct PAYG tax calculation applied.
Paying Leave "in advance" using Lump Sum Payments
Use this method if you want to pay an employee leave in advance — for example, when they’ve taken time off and would like to be paid upfront, without a spike in tax.
Scenario Example:
An employee worked last week, and is taking this week and next week off on Annual Leave. You want to pay all 3 weeks in one pay run.
Steps:
- Pay the regular (ordinary) hours as usual for the period the employee worked.
- From the employee’s pay run record, click the “Actions” button and select “Add Lump Sum Payment.”
- Choose the “Leave Taken” pay category.
- Enter the total number of leave hours to be paid upfront.
- In the Lump Sum entry, enter the number of pay periods the leave covers — in this example, 2 (this week and next week).
- This ensures the tax is aggregated over the correct timeframe and avoids excessive tax being withheld.
- Since paying leave this way does NOT automatically reduce the leave balance, you’ll need to:
- Click “Actions” > “Adjust Leave.”
- Select the relevant leave type.
- Enter a negative adjustment equal to the leave hours paid.
- ⚠️ Important: Make sure not to apply any earnings rules when adjusting the balance.
- Leave paid in this way does NOT accrue additional leave automatically. To fix this:
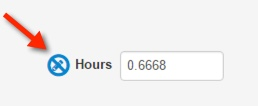
- Click the pencil icon next to the leave accrual value.
- Manually enter the correct accrual amount, excluding the advance leave hours.
- If leave loading applies, you’ll need to add it manually:
- Create a new pay category called “Leave Loading” (set it as a Fixed unit of payment).
- In the pay run, click “Actions” > “Add Earnings.”
- Select the Leave Loading category and enter the required amount.
Tax Adjustment (if needed):
If the system’s tax calculation doesn’t look right, or there are no ordinary earnings in the pay run:
- Click “Actions” > “Adjust PAYG.”
- Enter a:
- Negative amount to decrease the tax withheld, or
- Positive amount to increase it, based on your own calculation.
Processing a Bonus
If you are wanting to pay a bonus without needing to aggregate the tax simply follow these steps:
- Create a new pay run and use the 'Add Earnings' option on the 'Actions' button within the employee record in the pay run and select the 'Bonus' pay category to pay it.
- Remember - If you want to aggregate the tax on this bonus use the Add Lump Sum payment instead and enter the appropriate number of pay periods.
NB. the tax calculation will use the other earnings in the pay run to average out the tax so if you don't think the tax calculation is correct you can adjust the tax yourself - use the 'Adjust PAYG' option from the 'Actions' button, enter a negative adjustment to decrease the amount of tax calculated, or a positive one to increase it.
Override Automated Leave Accruals
If you need to manually override the values created for automated leave accruals, you can do so by following these steps:
- From within the pay run, click on the employee that you want to modify the leave accruals for.
- Scroll down to the "Accruals" section and click the blue pencil icon next to the leave record.
- The text box will become editable and you will be able to enter the value that you would like to override the leave accrual to be.
- If you'd like to cancel your override values, click the blue pencil button again and click save. The leave values will revert back to the automatic accrual amounts.
*** NOTE - Automated accruals can also be overridden in termination payout values.
Payroll Settings: Leave Categories
In Roubler, you can set up leave categories and control which will accrue automatically, how they will behave in the pay run, whether or not to include them in termination payments, and decide which should appear in your employees' payslips.
Management > Payroll > Payroll settings > Leave categories
Note: Any changes that are made to your business's leave category settings will not be applied to existing employees. The new settings will only apply automatically to new employees who are subsequently added to your payroll. To change leave settings for existing employees you will also need to make the same adjustments on each 'Employee file' > 'Leave allowances' page. You can do this in bulk by using a leave allowance template, then apply that template to each employee's record.
Default leave categories
The default setup for a new business includes the following leave categories:
- Annual Leave
- Leave Without Pay
- Personal/Carer's Leave
- Time in Lieu
- Long Service Leave
- Family and Domestic Violence Leave
Add new leave categories
- Click Add
- Read this document for examples of how to set up leave based on different scenarios
- Enter the following:
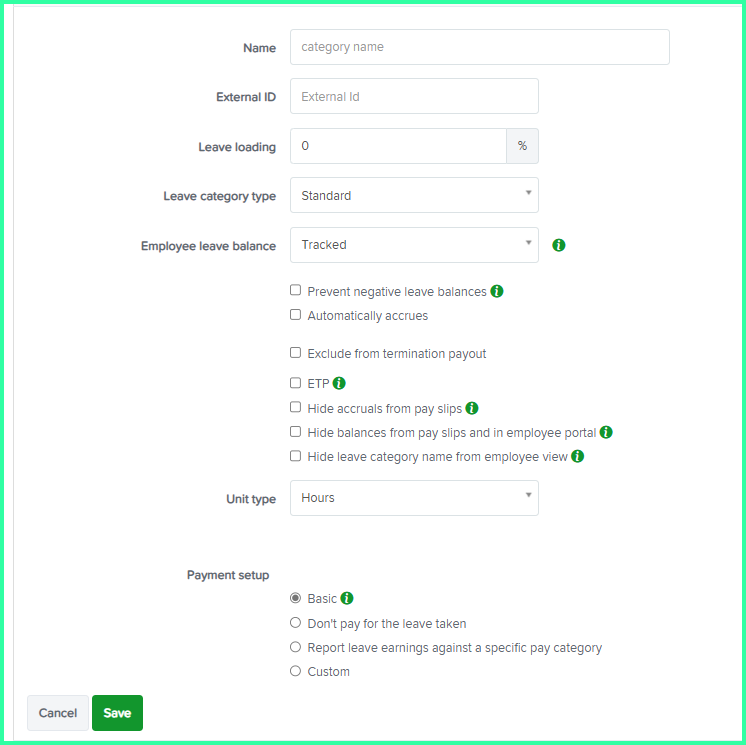
Name (required)
- External Id: This is only required if you are using an external system to capture leave requests or timesheet entries and hence need to map the code used from such external system
- Leave Loading percentage: Used to automatically apply leave loading, such as annual leave loading
- Leave Category Type: There is a drop down box to choose from 'Standard' or 'Long Service Leave'
- Employee Leave Balance: Choose from 'Tracked' or 'Not tracked'. For some types of leave that aren't accrued in the usual way (e.g. leave without pay) it might not make sense for an employee to have a leave balance. In these cases you should set this value to 'Not tracked' to tell the system it doesn't need to keep track of how much of this type of leave an employee is entitled to.
- Automatically accrues: Select this option if the leave is to accrue automatically. You will then be required to choose whether the leave will accrue on an ongoing basis or accrue based on a defined leave year. The leave year can be set as the employee's start date or another specific date. This date is specified via the employee's "Leave Allowances" page
- Exclude from termination payout
- Hide accruals from pay slips: Select this option if you do not wish to allow employees to see the amount of leave accrued for this leave category within a pay run on their pay slips;
- Hide balances from pay slips and in employee portal: Select this option if you do not wish to allow employees to see the balance of this leave category on their pay slips or in the employee portal
- Hide leave category name from employee view: Select this option if you do not wish to have the leave category name displayed in the calendar contained within the employee's portal. All that will be displayed is the employee name and the period of leave taken. This setting works in conjunction with the setting "Employees can view approved leave" from the Employee Portal Settings screen.
-
Standard allowance: This will only be displayed where leave is set to accrue automatically on an ongoing basis. Enter the number of hours per hour worked OR hours per pay run the employee is to accrue. You can also click on the calculator icon to assist with calculating the entitlement and ensuring the correct figure is being applied.
Leave accrual capping: This setting allows you to determine whether or not the number of hours accrued will be capped. If the accrual is to be capped, select "limited to" from the drop down list and then enter the maximum number of hours that should accrue:

- Accrue in advance: Select this option if you want employees to accrue their whole entitlement in advance. This means that the full annual entitlement will be accrued in the employee's first pay run and will be added to their leave balance;
- Leave accrual capping: This setting allows you to select whether or not the number of hours accrued will be capped. If the accrual IS NOT to be capped, select "not limited" from the drop down list. If the accrual IS to be capped, select "limited to" from the drop down list and then enter the maximum number of hours that should accrue;
- Carrying over the balance: This setting allows you to cap the number of leave hours to carry over to the next leave year. If the entire leave balance is to be carried over, keep the default setting of "the entire balance". If only a portion of the leave balance is to be carried over, select "a maximum of" from the drop down list and then enter the maximum number of hours to be carried over.
- Payment setup: This determines whether the employee is paid for the leave taken and the pay category that is assigned when leave is taken. (The default setting for Payment Setup on the Annual Leave - leave category used to be Basic but this has been updated in later releases so that leave hours are reported against a separate pay category called Annual Leave Taken - you are free to change this if necessary)
-
- Report the earnings for the leave taken against another pay category: When wanting to report payments for leave taken in a separate pay category (for reporting/journaling purposes), select this option. The earnings-related to the leave taken will be assigned against the specified pay category instead of the employee's primary pay category. When this alternative is selected, the option will be given to use the rate of pay from the employee's primary pay category.
- Custom: For advanced users only, this option allows the user to deduct hours from an arbitrary pay category and transfer them to another arbitrary pay category when leave is taken.
Weeks per year and days per year settings
We have removed the “weeks per year” and “days per year” leave accrual methods. For all new businesses and businesses that were not already using these accrual methods they will no longer be displayed as an option in the leave category or employee leave allowances pages.
If your business is already using either of these leave accrual methods, nothing will change and you will continue to accrue leave as you always have, however, we would strongly encourage you to consider switching to the “hours per hour worked” leave accrual method.
Alternative Method for Cashed-Out Leave Without Ordinary Earnings
If there are no ordinary earnings in the pay run, the lump sum payment method may not work correctly. Instead:
- Use the "Take Leave" function to pay the leave as a standard leave payment.
- Manually adjust PAYG tax:
- Click Actions > Adjust PAYG.
- Enter a negative adjustment to correct the tax amount.
Additional Resources
For more details on Australian leave regulations, visit:
🔹 Fair Work Ombudsman – Cashing Out Annual Leave
Leave Allowance Templates
A Leave Allowance Template will help make managing leave for employees much easier.
With leave allowance templates, you’re able to create pre-defined sets of leave accrual values which can then be applied to new and existing employees. This then allows you to bulk update leave values for employees if the leave accrual rates or accrual methods change rather than having to update them individually for each new employee.
Any business created from 28 August 2020 will have three default leave allowance templates configured, one for casual employees and two for permanent employees. The difference between the permanent employee leave allowance templates are as follows:
- Permanent Leave - No Loading: this template does not include a 17.5% annual leave loading. Additionally, the accrual and balance of personal/carer's leave is set in hours as opposed to days.
- Permanent Leave - With Loading: this template includes a 17.5% annual leave loading. Additionally, the accrual and balance of personal/carer's leave is set in hours as opposed to days.
Creating and managing leave allowance templates
- To setup a new leave allowance template, go to the 'Management' > 'Settings' > 'Leave Allowance Templates' page. Here you will see a list of the existing Leave Allowance Templates and will display the number of employees that are linked to that template:
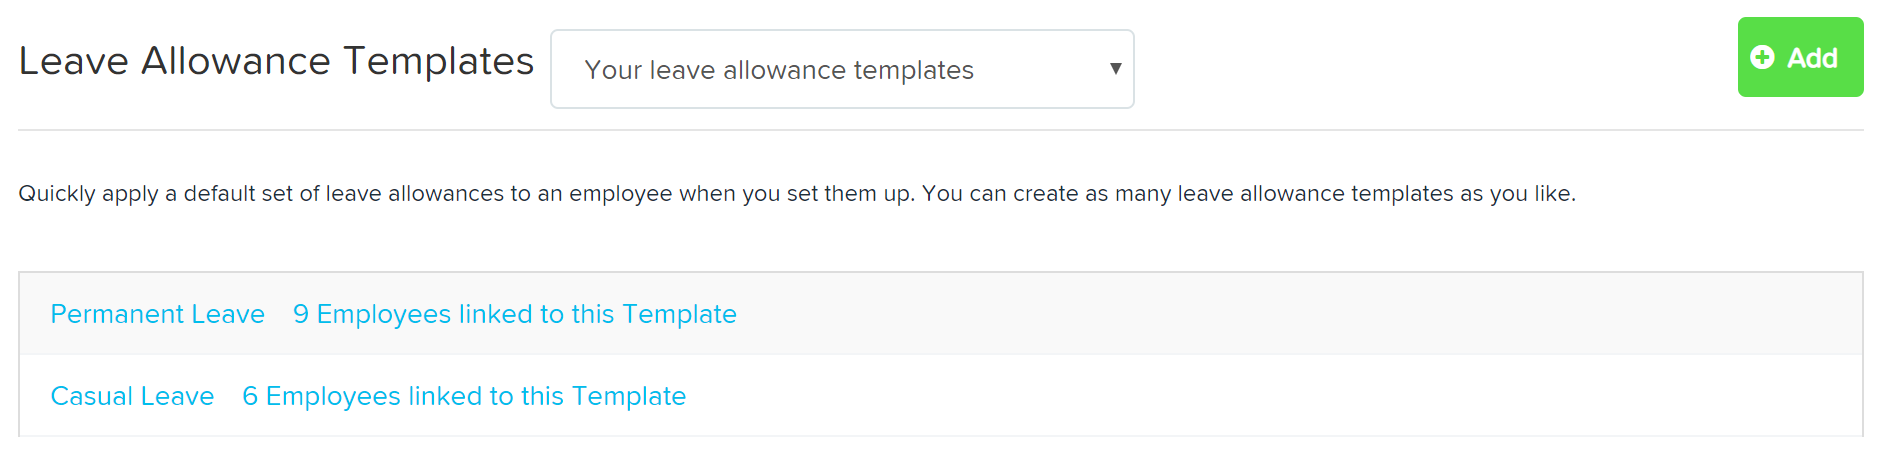
You can click on the number of employees linked to the template 'link' to see the details of all active and terminated employees linked to the template: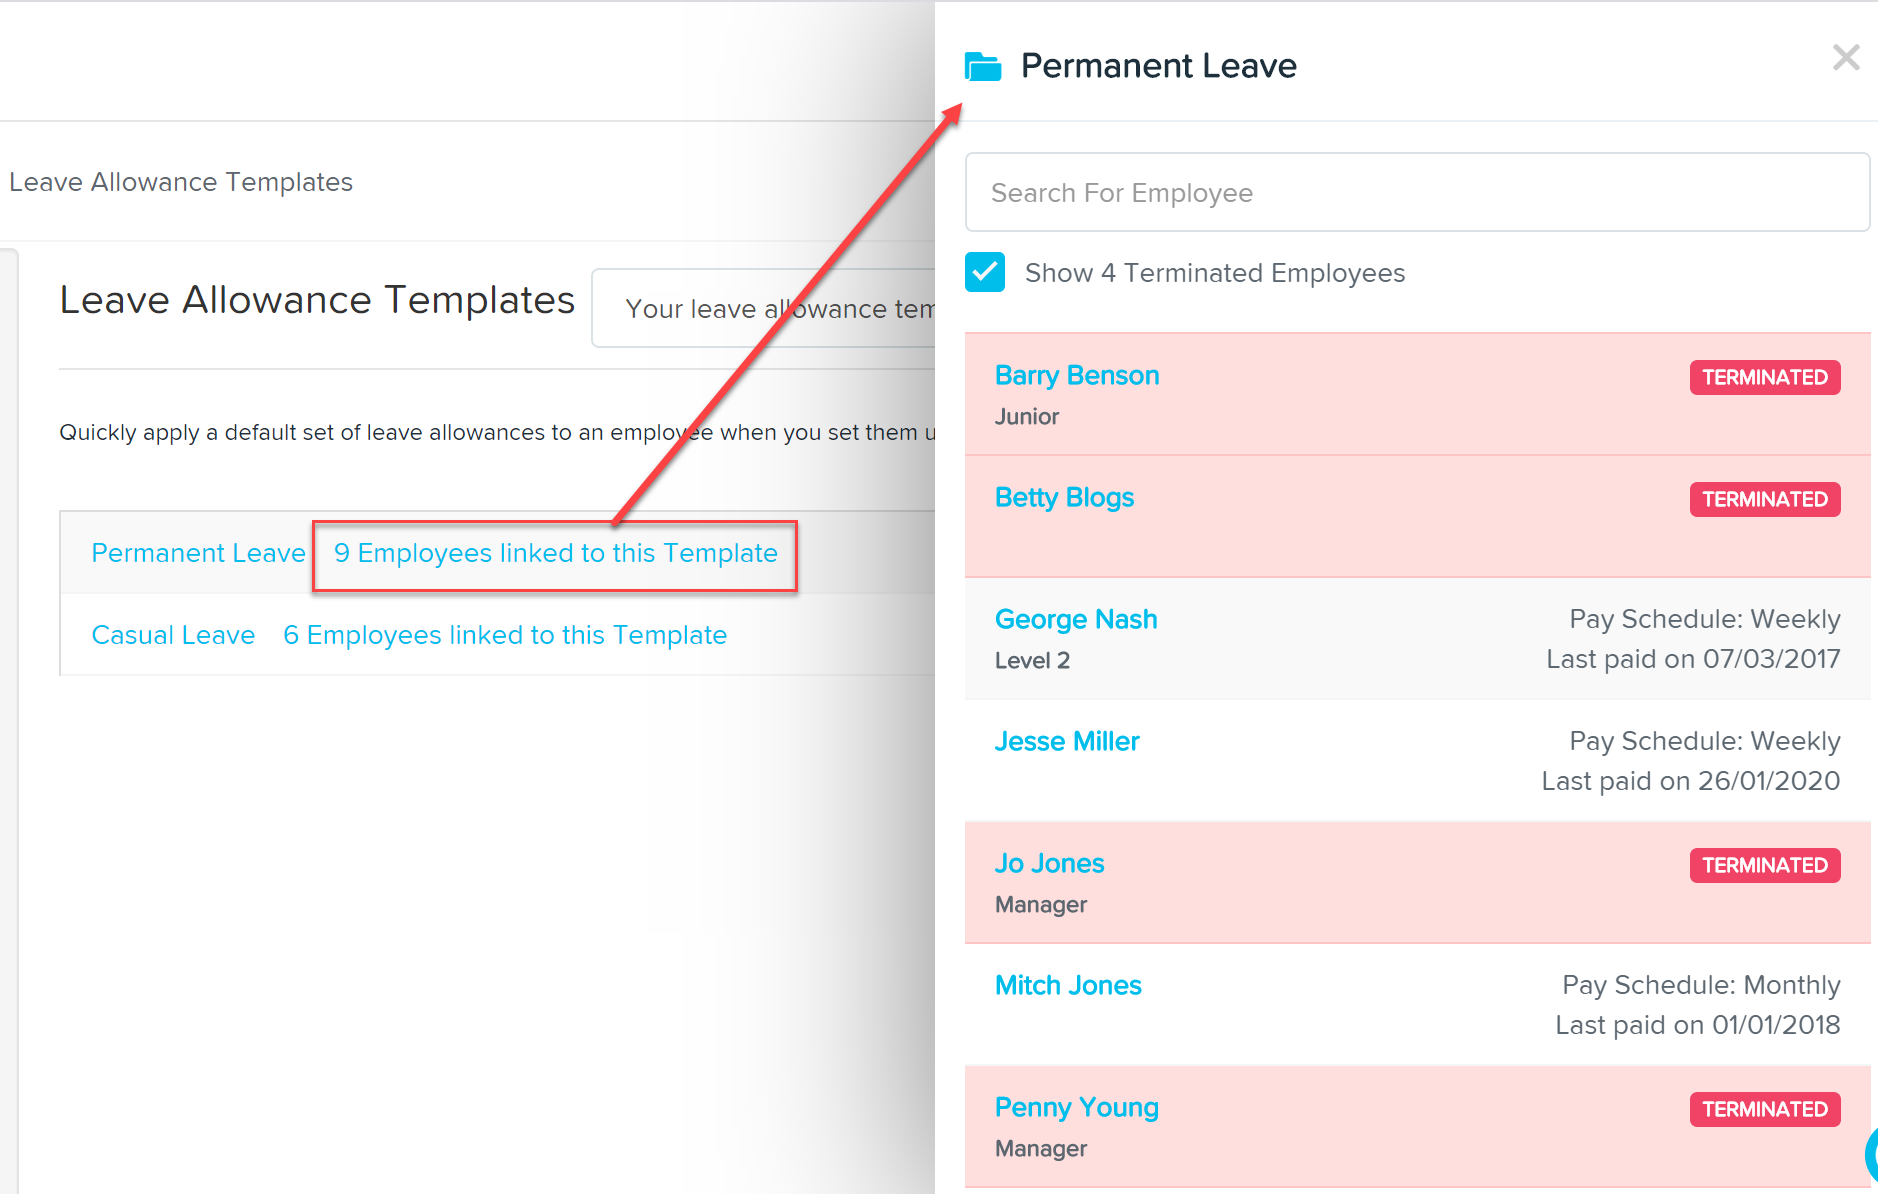
-
When creating a new employee.
-
To existing employees via their Leave Allowances page. Click on 'Add' to add a new template and fill in the relevant details. You’ll notice that only leave categories that automatically accrue leave are displayed in the Leave Allowances section. Enter a Template Name and then select the leave categories you want activated (i.e. you want employees to access) for this template.

On the Leave Allowance Template page, each leave category listed includes an Override button. Click the Override toggle (left of the "x") to activate editing. The default values will disappear, allowing you to enter custom values. Click Save to apply your changes and create the custom leave template.
Once saved, the template can be assigned when creating a new employee or to existing employees via their Leave Allowances page.
If you need to update the values in an existing template, click Save after making your changes. If any employees (active or inactive) are linked to the template, you'll be prompted to apply the changes to all of them.
-
Key Leave Template Settings
Leave Year Start Date
You can define when the leave year begins for each category: based on the employee’s start date, or a custom date of your choice.
Leave Loading
Specify a pay category to calculate leave loading (e.g. 17.5%). If left blank, the employee's primary pay rate will be used.
Note:
- Fixed pay categories cannot be selected.
- A pay rate must be set under the selected pay category on the employee’s Pay Rates page; otherwise, the loading value will be $0.
Enabled Leave Categories
Select which leave types are active and visible to employees.
Leave Category Configuration Options
For each leave category, you can customise:
Accrual Method
Choose to accrue leave in days, weeks, or hours, or as standard days/weeks per year, hours per hour worked, or hours per pay run.
Can Apply for Leave
Toggle this on to allow employees to request this leave type via the portal or app.
Override
Determines whether the leave category can be edited per employee.
Units
Set the entitlement amount. Use the calculator icon for a detailed accrual breakdown based on standard working hours.
Leave Loading
Enter a percentage if the leave type includes loading (e.g. 17.5%).
Accrual Settings Based on Leave Year
If leave is accrued based on the employee’s leave year, the following options become available:
Accrue in Advance
The full yearly entitlement is added upfront in the first pay run of the leave year.
Accrual Limit
Set a maximum number of units that can be accrued in a year.
Carry Over Limit
Set a cap on how much unused leave can be carried into the next leave year. Any balance above this will be adjusted during the pay run.
Long Service Leave: Contingent & Entitlement Periods
For long service leave, you can set:
Contingent Period
Determines when the leave becomes visible in termination pay calculations.
Entitlement Period
Determines when the employee becomes eligible to apply for the leave.
Copying a Leave Allowance Template
You can easily copy a leave template to create a variation.
Go to Payroll Settings > Leave Allowance Templates, hover over the template you wish to copy, and click the copy icon. A new version of the template will appear with “copy” in the name. Rename and edit as needed, then click Save.
How is PAYG Calculated on Leave Payouts?
PAYG amounts are calculated on leave payouts using the guidelines set out by the ATO here: Schedule 7 – Tax table for unused leave payments on termination of employment | Australian Taxation Office
Once you have chosen to terminate an employee from within the pay run the ATO formula will be applied to the leave payout component and be added to the standard PAYG amount that an employee will be required to pay.
To help clarify, here's an example with calculations:
Phillip is a part time employee earning $40.48583 per hour who works a different number of hours each week. This week he is due to be paid for working 30 hours plus his termination pay, which consists of 101.07288 hours of annual leave plus annual leave loading. Phillip is also an Australian resident claiming the tax free threshold.
To work out the total PAYG withheld from this pay:
- Work out the normal PAYG amount on Phillip's non-termination gross pay (being, 30 hrs x $40.48583 = $1214.57). PAYG on $1214.57 = $257
- Determine Phillip's 'normal gross earnings'. Normal gross earnings are all payments, except those relating to termination payments, received in the last full pay period of employment. This includes taxable allowances, overtime and bonuses. Therefore, your employee’s normal gross earnings should be taken to be the earnings relating to the last full pay period worked. Where your employee’s pay fluctuates significantly over a number of pay periods, the ATO accept an average of gross taxable earnings for the financial year to date over the number of pays received (NB. unscheduled or ad hoc pay runs are counted). The average earnings method is how we calculate the employee's normal gross earnings. Over the financial year, Phillip has earned $4,663.97 over 4 pay periods, averaging his earnings to $1165.99.
- Work out Phillip's gross termination leave pay out amount: (101.07288 annual leave hours x $40.48583) + (101.07288 x $7.09 annual leave loading rate) =$4,947.69
- Using the steps in the ATO's Marginal Rate Calculation:
- Calculate the PAYG on the employee's normal gross earnings of $1165.99 = $240
- Divide the total gross termination payout by the number of normal pay periods in 12 months ($4,947.69/52 weeks = $95.15)
- Ignore any cents: $95
- Add the amount at step 3 to the normal gross earnings:$1165.99 + $95 = $1260.99
- Use the same PAYG withholding tax tables used at step 1 to work out the amount to withhold from the amount at step 4 = $273
- Subtract the amount at step 1 from the amount at step 5 ($273 - $240) = $33
- Multiply the amount obtained at step 6 by the number of normal pay periods in 12 months (12 monthly payments, 26 fortnightly payments or 52 weekly payments): $33 x 52 = $1716
- Take the normal PAYG amount from this pay run and add it to the PAYG for the annual leave payout: $257 + $1716 = $1973
The above calculations can be viewed when clicking on the "?" icon in the employee's PAYG field:
Overriding an employee's 'normal gross earnings'
We have explained further above how an employee's normal gross earnings are calculated within the system. If you want to override this calculated amount and enter a different amount, you can do this by clicking on "Override normal gross earnings". This will unlock the field, allowing you to then enter your desired amount:
Upon clicking "Save", the termination pay will automatically recalculate based on the new normal gross earnings amount.
N.B. There may be circumstances where the termination PAYG amount does not change from the initial amount. This is simply because the difference between the initial and updated normal gross earnings figure is not sufficient enough to change the amount.
Leave Payments for Genuine Redundancy ETPs
If your leave payouts form part of a genuine redundancy employment termination payment, we will apply a tax rate of 32% to those payments (as per the ATO tax schedule referenced above) as well as allocating them to a pay category that will be reported as a "Lump Sum A" value on the employee's individual non-business payment summary.
Setting a Fixed Leave Year Start Date for Employees
If you want all employees' leave year to start on a specific fixed date each year, such as 1 April, you need to update the leave category settings and ensure each employee’s leave allowances are correctly configured.
✅ Key Requirement:
Leave categories must be set to automatically accrue based on the employee’s leave year.
⚠ Important Note:
This setup is particularly useful for businesses that do not base leave accruals on an employee's individual start date but instead use a common leave year for all employees.
Step 1: Update Leave Category Settings
To configure this, follow these steps:
- Go to Management > Payroll > Payroll Settings > Leave Categories.
- Select the leave category you want to modify.
- Locate the Accrual Method setting and set it to "Automatically Accrues".
- From the dropdown menu, select "Based on the employee's leave year".
- Click Save.
Step 2: Update Employee Leave Allowances
Once the leave category is updated, you must ensure each employee’s leave start year aligns with 1 April.
How to Update Each Employee’s Leave Year:
- Go to Management > Employees > Select Employee.
- Click Leave Allowances.
- Ensure the Leave Year Start Date is set to 1 April.
- Set the leave accrual method to "Based on the employee's leave year".
- Click Save.
Additional Considerations
-
Does this apply to all types of leave?
- This setup is commonly used for Annual Leave and Personal Leave, but you should verify if any specific industry awards or enterprise agreements apply to your business.
- Check Fair Work Australia for general leave entitlement rules:
🔗 Annual Leave Entitlements – Fair Work Ombudsman
🔗 Personal/Carer's Leave – Fair Work Ombudsman
-
What happens to existing leave balances?
- Existing balances remain unaffected, but leave will now accrue from the new fixed start date instead of an employee’s individual hire date.
-
Can this be applied in bulk?
- Yes. If you have a large number of employees, you may export employee data, update the leave year start date in the file, and re-import it to apply changes in bulk.
Export Leave
As a manager, you can export data from the Leave page by applying your desired filters and then selecting the Export option.
Convert a Roster Shift to Leave
Managers can convert a published shift to leave within the roster by following these steps:
- Click Roster in the main navigation bar.
- Click on the shift you want to convert to leave.
- Click Convert to leave.
- Select the Leave type, Start time, and End time.
- Choose one of the following options:
Option 1: Convert
- Converts the shift into a timesheet under Manage Time.
- Creates a pending leave request for approval.
Option 2: Convert and Approve
- Creates a timesheet under Manage Time.
- Creates and approves the leave request.
- Generates a leave timesheet automatically.
- After conversion, the original shift will remain in the roster with an alert:
"Shift overlaps with Leave".
A second shift will also appear under the Leave section of the roster. - You will then be prompted to choose whether to delete the original shift. This decision affects whether an unassociated shift will be created:
Option 1: Delete the Shift
- No unassociated shift will be shown for that employee.
Option 2: Leave the Shift in the Roster
- The shift will appear in the Time page as an unassociated shift, since there are no clock-in records to indicate that the employee worked that day.
As part of our continuous efforts to improve our products, changes have been made to how the system behaves when “Leave is applied” to Autopay Salary employees. You will notice that the system now produces only two earning lines, previously four. The net effect of these two earnings lines is $0.
Converting hourly leave configuration to day or weekly based leave
This guide provides step-by-step instructions on updating your business and employee leave settings to convert leave accrual from hourly units to days or weeks. This includes changing a leave category’s accrual method from:
- "Hours per hour worked" or "Hours per pay run"
→ to "Standard days per year" or "Standard weeks per year"
⚠ Important Note: Some businesses may still have the older "Days per year" and "Weeks per year" accrual methods in their settings. These are different from the new standard methods, and this guide does not cover their use.
Steps to Convert Leave Accrual Units
1. Configure Employee Daily Hours
Before converting leave balances, you need to ensure each employee's daily hours are correctly set.
💡 This is crucial because when leave is processed, the system needs to determine how many hours to deduct per day taken.
How to Set Employee Daily Hours:
- Go to Management > Employees > find your employee > navigate to pay run defaults page
- Locate the new field “Hours per Day”.
- If an employee has variable work hours (or advanced work hours are not configured), manually calculate their daily average by:
- Formula: Total weekly hours worked ÷ Number of days worked per week
- Example: An employee working 38 hours per week over 5 days = 7.6 hours per day
- Bulk Update:
- Export the Employee Extract Report.
- Fill in column BF (HoursPerDay) for employees who need updates.
- Import the updated file back into the system.
2. Convert Leave Balances from Hours to Days or Weeks
Step 1: Generate a Leave Balance Report
To determine existing leave balances, generate a report before making adjustments.
How to Run the Report:
- Navigate to Reports > Leave Balances
- Select the latest finalized pay period
- Click Generate Report
This report will display leave balances in hours, which you will convert using the formulas below.
Step 2: Convert Leave Hours to Days or Weeks
Use the following formulas:
-
Convert to Days:
Leave Balance (hours) ÷ Employee’s Hours per Day
Example: An employee with 30.4 hours of Family & Domestic Violence Leave, working 7.6 hours per day:- 30.4 ÷ 7.6 = 4 days
⚠ Note for Family & Domestic Violence Leave:
- Under the National Employment Standards (NES), the maximum entitlement is 5 days per year.
- Any unused leave does not carry over.
- Ensure balances are capped at 5 days, even if the conversion suggests a higher value.
- More information: Fair Work Ombudsman – Family & Domestic Violence Leave
- Convert to Weeks:
Leave Balance (hours) ÷ Employee’s Hours per Week
Example: An employee with 120 hours of Annual Leave, working 38 hours per week:- 120 ÷ 38 = 3.16 weeks
Step 3: Zero Out Existing Leave Balances
-
Create an Adhoc Pay Run:
- Do not use a normal pay run, as this affects future leave calculations.
- Set the pay period end date to one day after the last finalized pay period.
- Tick "Create pay run with empty pays".
-
Reverse Leave Balances in the Pay Run:
- Click Actions > Adjust Leave.
- Select the relevant leave category (e.g., Annual Leave, Personal Leave).
- Enter a negative adjustment equal to the employee’s current leave balance (shown in the report).
- Untick "Apply Earnings Rules".
- Save and finalize the pay run.
- Do not publish pay slips, as this is just an adjustment.
3. Update Leave Allowance Template (LAT) Settings
⚠ Before restoring leave balances in days/weeks, update the Leave Allowance Template (LAT) settings to ensure correct unit types.
How to Update LAT Settings:
-
For Leave Categories That Are NOT Tracked (e.g., Compassionate Leave)
- Go to Payroll Settings > Leave Categories.
- Change Unit Type from Hours to Days.
- Click Save, then confirm changes when prompted.
- Apply these updates to all employees assigned to this template.
-
For Tracked Leave Categories (e.g., Annual Leave, Personal Leave)
- Navigate to Payroll Settings > Leave Categories.
- Change:
- Unit Type: Days/Weeks
- Accrual Method: Standard Days per Year or Standard Weeks per Year
- Adjust:
- Capping rules (e.g., max 5 days for Family & Domestic Violence Leave)
- Carryover settings (e.g., Annual Leave may carry over, but some leave types do not)
- Save and apply changes to all assigned employees.
4. Restore Leave Balances in Days/Weeks
-
Create Another Adhoc Pay Run
- Use the same settings as in Step 3 (Zeroing Leave Balances).
- This time, add the converted leave balances.
-
For Each Employee:
- Click Actions > Accrue Leave.
- Select the relevant leave category (Annual Leave, Personal Leave, etc.).
- Enter the converted leave balance (days/weeks).
- Save and finalize the pay run.
- Do not publish pay slips, as this is just a correction.
5. Update Business Leave Settings for Future Employees
Once the changes are applied to existing employees, ensure new employees inherit the correct settings.
Update Business Leave Categories
- Go to Payroll Settings > Leave Categories.
- Change:
- Unit Type to Days/Weeks
- Accrual Method to Standard Allowance (Days/Weeks per Year)
- Save changes.
Ensure Leave Allowance Templates (LATs) Are Updated
- If your business uses LATs, update them as outlined in Step 3.
- If not using LATs, consider implementing them for easier leave management.
Bulk Updating Employee Leave Balances
Bulk Update Leave Balances
Adjusting leave balances manually can be time-consuming—especially when multiple employees require changes. Previously, leave balances could only be updated one employee at a time.
To improve this process, we’ve introduced a Bulk Leave Balance Update feature
Why Use Bulk Updates?
This feature is especially useful in scenarios such as:
- Policy changes affecting leave entitlements (e.g. the introduction of Paid Family and Domestic Violence Leave).
- Incorrect leave accruals where balances need to be wiped or corrected.
- Missed accruals where leave must be added to employee entitlements.
Follow the steps below:
- Log in to your Roubler platform.
- Go to Management > Payroll > Pay Run.
- Click New Pay Run or open an existing pay run and unlock it if needed.
- Select Pay Run Actions.
-
Click Bulk Adjust Leave Balances.
Note: Previously, leave balances had to be adjusted one employee at a time. This feature allows you to adjust a leave category for multiple employees in a single step.
-
In the context panel that appears:
- Choose whether to apply changes to All Employees in this Pay Run or Search by Employee List, then select the employees.
- Choose the Leave Category you want to adjust from the dropdown.
- Click Apply.
- You'll return to the main Pay Run view, where a new tab will appear: Leave Balance Adjustments.
- Click the Leave Balance Adjustments tab to view and finalise the changes. You will see:
- Employee name
- Leave category
- Current balance
- Leave adjustment
- New leave balance
- Notes
- Status
- For each employee:
- Enter the new leave balance. The system will automatically calculate the adjustment.
- Add any notes, if needed.
- Select the employees you want to apply the changes to.
- Click Apply to Pay Run to finalise the adjustments.
Using Filters in the Leave Balance Adjustments Tab
When working in the Leave Balance Adjustments tab, there are three main filters across the top of the page:
- Search employees
- Select category
- Search employees (repeated for quick access)
These filters help you easily manage and focus on specific adjustments.
Search Employees
To locate a specific employee:
- Make sure you're in the Leave Balance Adjustments tab.
- Use the Search bar at the top left to type and find the employee by name.
- Once found, enter the adjustment details as needed.
This is helpful if you only want to adjust one employee from a larger bulk update.
Select Category
If you've applied multiple bulk adjustments across different leave categories, you can filter the view by leave type:
- Stay in the Leave Balance Adjustments tab.
- Use the Category filter at the top of the page to select a leave type.
- This will display only the employees associated with that specific leave category.
This makes it easier to manage updates category by category or quickly find specific entries.
Additional Leave Adjustments
To add more adjustments after completing the first batch:
- Click the Additional Leave Adjustment button.
- This will reopen the Bulk Leave Adjustment panel.
- Choose employees using either:
- All Employees in this Pay Run, or
- Search by Employee List
- Select a new leave category, then click Apply.
You can use this feature to:
- Add a second category of leave adjustments, or
- Include more employees to an existing adjustment batch.
Clear All Values
If you’ve entered multiple adjustments but run into errors or need to start over:
- Go to Leave Balance Adjustments.
- Click Clear All Values to reset all entered data.
This allows you to re-enter the adjustments cleanly without needing to exit the pay run.
Leave Without Pay - Annual Holidays
When taking leave without pay (LWOP) there are two options as to how an employee’s annual holidays is managed thereafter, as agreed between the employer and employee.
Contained in this article are the following topics:
- Leave without pay system default categories
- Employee settings
- Pay run / Annual holidays calculations
- Leave calculations context panel
- Reports
If an employee takes a continuous period of annual holidays without pay for more than one week (not including daily based pay e.g. unpaid sick or unpaid bereavement leave):
- their anniversary date for entitlement to annual holidays moves out by the amount of unpaid leave taken (not including the first week). This means the employee becomes entitled to their annual holidays later each year from then on; OR
- the employer can agree with the employee that their anniversary date for annual holidays entitlement won’t change. If they agree to this, the employer must also reduce the divisor for calculating average weekly earnings for annual holidays by the number of weeks or part weeks greater than one week that the employee was on leave without pay.
If the employee takes eg two periods of LWOP, each being one week in duration, this does not have any impact on the anniversary date. The period of LWOP greater than one week must be in one continuous period.
NB: Unpaid annual holidays only occurs if the employee takes more than 1 week of LWOP annual holidays. It does not apply if the employee takes LWOP annual holidays of 1 week or less.
Leave Without Pay – System Defaults and Employee Settings
The system includes a preconfigured Leave Without Pay (excluding annual holidays) category with the following default settings:
- Leave balance: Not tracked
- Unit type: Hours
- Payment setup: Do not pay for the leave taken
These leave categories also appear in Leave Allowance Templates and are linked to the appropriate work types.
⚠️ Note: These leave categories will appear in leave allowance templates but are set to disabled by default.
For businesses created before 1 September 2021, it’s important to review your leave settings and:
- Disable the old Leave Without Pay leave category, and
- Enable the new Leave Without Pay leave categories.
Employee-Level Settings
In each employee’s profile, under Leave Allowances, there’s a setting for Unpaid Annual Holidays.
- The default setting is: Move anniversary date
- The default date used is the employee’s start date
This setting gives you two options for handling Leave Without Pay related to Annual Holidays:
- Move anniversary date
The employee’s annual holidays entitlement date will shift forward by the number of weeks (or part-weeks greater than one) they were on unpaid annual holidays. - Reduce AWE divisor
The system will reduce the employee’s Average Weekly Earnings (AWE) divisor by the number of weeks (or part-weeks greater than one) spent on unpaid annual holidays.
💡 Note: If you update this setting at the employee level, it will override the business-level setting for that employee only.
Configuring Leave Rules and Entitlements (directly in Roubler)
This feature applies to integrations with AU, UK, and NZ pay engines.
By default, all leave types are visible to full-time and part-time employees. However, Leave Rules allow administrators to control which leave types employees can apply for. If a Leave Rule is deleted or removed from an employee’s profile, the system falls back to the default settings, making all leave types visible again.
Setting Up Leave Rules
-
Navigate to Leave Rules:
- Go to Management > Settings > Leave Entitlements.
- Click the Add (+) icon to create a new Leave Rule.
-
Configure the Leave Rule:
- Assign a name to the rule.
- Set an effective date (the rule will only apply from this date onwards, not retroactively).
- Save the rule.
-
Add Leave Types to the Rule:
- Click the Edit (pencil) icon under the Actions column.
- Select the leave types employees assigned to this rule can apply for.
- Save changes.
-
Assign the Leave Rule to Employees:
- Open the Employee Profile.
- Go to the Finance and Payroll tab.
- Assign the Leave Rule to the employee.
-
Verify Setup:
- Go to Leave Module > Leave & Availability in the employee profile.
- Click Request Leave and check the Type dropdown to confirm the employee only sees the assigned leave types.
Important Notes:
- Leave Rules are not retroactive – they only apply from the effective date set.
- Pending Leave Requests are NOT updated if:
- The effective date of the rule changes.
- A new leave rule is assigned to an employee.
- A leave type is removed or deleted – pending requests must be manually addressed.
- Error Message:
- If an employee tries to request an unavailable leave type, they will see:
"The selected leave type is not available to the employee for the provided date range."
- If an employee tries to request an unavailable leave type, they will see:
Leave calculations (amount and cost) are based on pay items configured in the pay engine.
Final Checks Before Payroll & Additional Resources
Before processing payroll, make sure all leave information is accurate and up to date. Use the checklist below to confirm:
- ✅ All leave has been fully processed, not just approved — ensure leave requests have moved through to timesheets and are included in the pay run.
- ✅ Employee profiles are fully synced — Roubler pulls leave balances from the pay engine, so unsynced profiles may cause discrepancies.
- ✅ Leave adjustments have been reviewed and saved — double-check any manual or bulk changes made to leave balances.
- ✅ Minimum leave balance thresholds are correctly applied, if in use, and behaving as expected.
For more detailed information on leave entitlements, refer to your country’s official guidelines:
Comments
0 comments
Article is closed for comments.